![[buy it
now!]](http://quartus.net/images/regsoft.gif)
Quartus RsrcEdit is a Palm resource editor that runs on the Palm and allows users to view and change application resources using a forms-based editing environment tailored for specific resource types.
Quartus RsrcEdit is 'try before you buy'; a registered version is available via RegSoft for $15 USD.
Users should refer to the Palm SDK (http://www.palmos.com/dev/tools/sdk/) documentation for information regarding the format and use of resources.
In this release, Quartus RsrcEdit provides templates for editing Form (tFRM), Menu (MBAR), Alert (Talt), String (tSTR), Icon (tAIB), Application Name (tAIN), version string (tver) and Bitmap (Tbmp) resources. Other resources can be edited within a generic hex-editor.
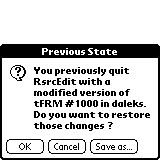
After selecting a resource for editing, either with a specific editing template or the generic hex editor, changes can be made to that resource (unless it's a ROM database) and those changes will be committed to the resource database when the 'OK' button is tapped. If the resource contains sub-components (for example, fields within forms) changes to those components will not be written to the database until the 'OK' button on the main resource editor is tapped. If changes have been made to a resource and then RsrcEdit is exited, by the user launching another application, the modified resource while be retained and be available when RsrcEdit is re-launched :
If the 'OK' button is tapped, the appropriate editor is launched with the modified resource presented ready to continue the editing session. The 'Cancel' button causes the modified resource to be discarded and the 'Save as...' button allows the resource type and id to be changed prior to writing the resource into the original database.

The 'Options' menu provides for creating a new database, deleting the selected database, duplicating the selected database, viewing the AppInfo associated with a database and beaming the database to another Palm running Quartus RsrcEdit (and that has infrared capability.)
If the selected database is a TealPaint (http://www.tealpoint.com) database (type 'Data', creator 'TlPt'), selecting 'Open TealPaint Database' from the 'Options' menu will display a list of the individual images from that database and allow the user to copy an image to the resource clipboard as a Bitmap resource.
If the selected database is a resource database the menu option 'Build Resource List' provides a way of generating a programming language (Forth or C supported) friendly source list of the resources in the database. That list can be generated as either a Doc database or Memopad record.
Pressing the 'Open' button will open the resource or the record editor on the selected database, depending on the type of the database. For now the record editor allows only hex-editing on each record.
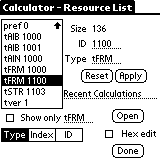
The field below the Reset and Apply buttons will display pertinent details about the selected resource if possible (e.g. the title of a form resource).
The 'Show only' checkbox, when selected, will limit the resource list to resources of the specified type.
The 'Type, Index, ID' buttons allow the resource list to be sorted by that respective attribute. (Index is the order of the resources in the database).
The 'Done' button transfers control back to the database list form.
The 'Edit' menu provides support for Cut/Copy/Paste/Delete for the selected resource. A resource in the clipboard may be transferred to other resource databases, but is lost between successive invocations of Quartus RsrcEdit. The 'New' menu allows creation of Form, String, Menu bar, Alert, Icon, Bitmap, Application name (tAIN) and version string (tver) resources. Other resources (the New -->Generic selection ) may be constructed (after a fashion) by specifying the type, ID and size - any data would then have to be entered in the hex editor.
Pressing the 'Open' button with a resource selected opens either the hex editor (if the 'Hex edit' checkbox is selected) or the template editor for that resource. If a template editor does not exist for the selected resource type, the hex editor opens regardless.
The 'Adjust' button also displays the form being edited, but allows each item on the form to be selected and moved using either pen strokes in the Grafitti letter area (stroke from left to right to move the selected item to the right, etc.). Alternatively the hard buttons will also move the selected item - page up moves it up, 'Calendar' or 'Address' move it to the left, etc. In this view, the 'Find' silk-screen button will return to the appropriate editor for the selected item.
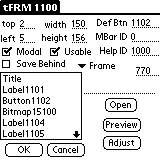
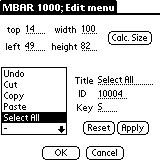
The 'Edit' menu provides for Cut/Copy/Paste/Delete of the selected form object. Form objects can be moved via the clipboard to other forms in the same or other resource databases. The form object clipboard is independent of the resource clipboard. The 'New' menu provides for creating form objects - Field, Control (Buttons etc.), List, Table, Bitmap, Label, Title, Popup, Graffiti, Gadget and Scrollbar. Choosing any of these will construct a default empty object and bring up the appropriate object editor. Pressing 'Cancel' on the object editor will still leave the empty object in the object list.
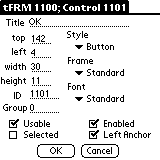
Most of the object editors are simple dialogs allowing for changes to numeric values and flag settings. More complex are the Control, List and Table editors.


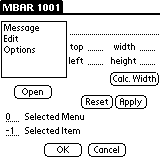
When a menu title is selected and the 'Open' button pressed, the menu title editor opens.
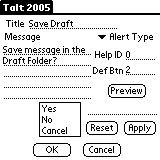
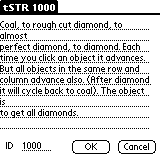
The alert resource changes are written to the database when the 'OK' button is pressed, discarded otherwise.
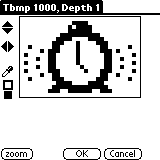
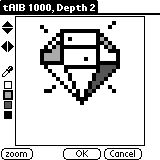
Under OS 3.5, the 'Choose' menu provides for selecting among the available depths for each bitmap - if a requested depth doesn't exist, the user will be asked if one should be constructed at that depth. The 'Delete' menu item deletes the currently selected depth (unless there is only one depth, in which case the bitmap will have to be deleted from the resource list instead). Also under the 'Choose' menu, the 'Properties' menu item invokes a dialog that provides control over the size of the bitmap as well as the transparency setting. Reducing the size of the icon will lose bits beyond the new dimensions.
The 'Edit' menu allows copying and pasting of the currently selected bitmap, multiple depth bitmaps are copied/pasted via the resource list edit menu. Pasting from the clipboard into a bitmap of a lesser depth will cause color information to be lost.
Under OS's prior to version 3.5, the 'Edit' menu item allows the icon dimensions to be changed. Reducing the size of the icon will lose bits beyond the new dimensions.
The 'OK' button writes the new icon bits to the resource database, the 'Cancel' button discards the changes. The 'zoom' button toggles between 1,2 & 4 times magnification. The scroll buttons scroll the displayed portion of the bitmap. The icon is edited by drawing directly on the image space. The pen color is changed in different ways - for 1bpp or 2bpp depths, the current pen color is indicated by the selected rectangle at the left edge of the image, below the dropper icon. For 4bpp or 8bpp only the current pen color is displayed, tapping that rectangle will bring up a palette dialog to allow choosing a new color. In any depth, selecting the dropper and then tapping a pixel on the image will set the pen to the color of the image at that point.

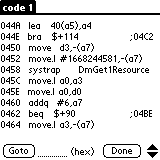
A new hex offset may be entered in the Goto field, and the 'Goto' button then switches to display that offset on the top line.
The changed data is written when the 'OK' button is pressed, and discarded if the 'Cancel' button is pressed.
The 'Disasm' button switches to a disassembly of the data, beginning at the offset at the top of the current display. Offsets at the right edge give the target of PC-relative displacements and, if selected, will become the new value of the 'Goto' field. No editing is possible within the disassembler, but changes in the Hex Editor will be reflected here. The disassembly listing can be written out as a DOC database by selecting 'Save to DOC db...' from the 'Options' menu. Also on that menu is 'Toggle RTS to LINK handling' which controls whether the bytes between an RTS instruction and the following LINK instruction are interpreted as data or instructions.